Thursday, February 4, 2021

"...That's when I knew I was being struck by lightning!"

The Confluence of the Colorado River and Green River in Canyonlands National Park, Utah.  
It's funny how sometimes when you end up in exactly the right/wrong place at the right/wrong time, you can look back and recount very accurately the series of events and decisions that brought you there.  My life is FULL of happy accidents, and divine "interventions".  I posted a little over a year ago about a time when I found myself living in South Lake Tahoe, and happened upon someone buried in a tree-well under feet of heavily falling snow.  You can read about that here.  I don't believe in coincidences... or rather, I believe that everything is connected, and nothing happens without causal reason.  I also feel a deep connection to the divine energy present throughout creation, and gratefully share its majesty.

The Journey

I was heading back to Las Vegas from Colorado, where I left my car while I was in Hawaii to avoid baking in the desert, and was planning on stopping in Canyonlands for a day or so, as is my modus operandi.  My intention was to capture a time-lapse series of the night sky over the canyons, and continue to Vegas.  I was quite successful in capturing the night sky at False Kiva (That will be a supplemental post).  The next day, however, my reason for returning to Vegas, a client who booked a portrait shoot, called and cancelled.  So I was faced with the decision to keep going to Vegas, or head down south to the Needles section of Canyonlands and explore new territory.  I looked at my map and saw that I could hike to the confluence of the Colorado and Green Rivers, or hike inside the Needles.  Both places looked pretty cool as per my google image search, but the Confluence was the only place I knew I could have an interesting foreground facing west, so I planned my route and went.  Vegas could wait an extra day.

According to what I read, the hike to the Confluence overlook was 10-miles round trip.  It was a clear, hot day.  My car thermometer read 107.  But I had plenty of water, food, and first aid... I had a feeling it would be a great day of rugged beauty.

I couldn't help but think of Aaron Ralston as I entered the southern canyonlands.  I met him at an event I sang for, where he was the speaker.  His story of being pinned by a rock for days and having to cut off his lower arm to escape has always motivated me to be a little more careful about letting someone know where I'm planning on hiking.

I stopped by the ranger station and informed the ranger on duty of my plans.  He made sure that I knew there wasn't much cover on the hike to the confluence, which I did.  It was early in the afternoon, and I figured it would take me about an hour to an hour-and-a-half to hike the 5-miles.  That would leave me plenty of time to explore the rim and set up the best angles.
Horseshoe Bend
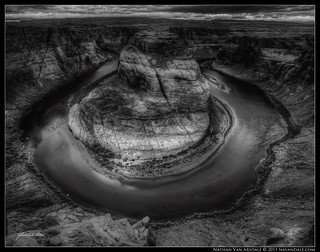
Horse Shoe Bend, Page, AZ
After parking at the trail head I double-checked my supplies and headed towards the confluence.  The trail was actually pretty easy to follow.  Cairns were distanced pretty close throughout the journey, so I knew I could find my way back at night, since I wasn't planning on back-country camping (although I was prepared to).  Aside from a few little lizards and crows every now and then, the landscape was devoid of wildlife.  After about three miles I noticed thick clouds about 15 miles to the southeast.  Nothing overhead but sweltering sun.  I really hoped I would get an interesting composition for sunset... maybe if those clouds would head my way.  Every time I've ever visited Horse Shoe Bend in Page, AZ, a similar landscape, I end up with a pretty boring sky, or typical head-on composition.

Getting There

I arrived at the Confluence Overlook at about 5:00... about an hour and a half from my time of departure, but I still had about 3-hours before sunset.  After checking the time on my phone I turned my phone back off to save battery.  The overlook didn't offer much in the way of interesting compositions.  So, I hiked around the area looking for better compositions, careful not to hike on the cryptobiotic crust.  During my scouting I came across a couple of sound-capturing devices mounted on tripods.  I could only imagine what types of sounds they recorded.  I thought of this article that a friend shared with me about the sounds of different habitats over time.  Very cool stuff.

I found the perfect spot.  A flat area of rock a little south of the overlook had a great view of the confluence and the bend in the joined rivers.  In order to fit this tight scene from that angle, I would have to use my 15mm Canon fisheye and photograph a panorama.  I set up my camera and tripod and took some test shots.  A couple of clouds had formed in the sky creating shade from the hot sun.  It was a relief.

Satisfied with my composition, I covered my camera, stashed my gear under a rock overhang, and laid down for a little nap (camel backs make great pillows!).  I still had about three hours until sunset, and I was kind of beat.  I must have slept for a couple of hours, very comfortably I might add, when I was woken up with rain dropping on my face.  Nothing heavy, just big fat drops here and there, but the sky was filled with thick clouds, and I could see sheets of lightning and hear rumbling thunder.  I enjoyed the refreshing coolness of the rain for a moment before taking shelter under the rock overhang along with my gear.

The Storm

The rain picked up and became a deluge.  I was completely dry under the five-foot overhang of sandstone that created a natural shelter.  Fortunately for me, the wind was coming from behind the my alcove.  The rain turned into hail, and lightning was striking very near behind me.  I decided to put everything metal from my pockets in my camera bag, just in case.  It was quite the show... although I was a little worried that the wind might knock over my tripod.  I watched my camera, fifty yards away over boulders, exposed on the ledge of a cliff, covered in protective rain gear, sitting steady on its tripod, and internally kicked myself for not grabbing it and bringing it to the shelter with me.

As fast as it started, the hail let up to light rain.  The clouds continued on, and blue sky showed above me.  I watched the storm blow across the canyon, like a heavy metal concert in the sky.  I had no idea what time it was, or how long I had slept.  So, reflexively I pulled out my phone, which had been off most of the hike, and turned it on to check the time.

That's when I knew I was being struck by lighting.
This photo from a few years ago was
taken by Fred Morlege (photofm).
I reprocessed it to make it look
a little more "electric"

The air suddenly felt very warm and still.  My arm hairs stood on end, and I could smell the electricity.

Suddenly, a tremendous noise, as though from inside me, boomed as a power chord played on an over-amped bass guitar through an arena-sized subwoofer.  I was lifted off the ground... just a little jump, I'm not sure if from being startled, or from the concussion of air the sound made, but inside my torso felt like I was experiencing a few G's... like riding a roller coaster.

From my phone danced a white spark like a foot-long flame that traveled down my arm and through my body.  Everything flashed white!

It smelled kind of like metal tastes.

Immediately I turned off my phone and crouched underneath my overhang, quick to put my phone back in my camera bag.  I smiled out at the storm and replied, "Got the message... no phones."

The storm continued on.  I watched as it settled over the land on the other side of the canyon, and the sun started to dip below its far edge on the horizon.  I started to get excited.  This was going to be an AMAZING sunset!

I've photographed lightning before, but
was unable to get any this time.  This is
a scene from Graz, Austria.
As the sun continued to dip below the storm, the rain, hail, and clouds started to glow with shades of orange, red, and magenta, and the tops of the clouds were a rich blue.

I have often mentioned my enjoyment of the music of nature.  This sunset was one of the best songs ever!   Everything was in harmony: powerful, gentle, water, rock, sky, red, blue... this was a gift!

Gratefully, and cautiously, I stepped out of my alcove and headed down the rocks to my camera.  It was INCREDIBLY windy!  Behind me another set of storm clouds were a few miles away, but moving in.

Bathed in Light

Then the sun broke through and illuminated just the ledge I was standing on, and the wind died down.  Everything was fresh, warm, and vibrant.  I was bathed in light.  I felt so much gratitude to be taking part in this beautiful portion of creation.  The sun continued to move down and illuminate more of the ridge, including the overlook, which glowed red.

A view of Confluence Overlook, the confluence, Island in the Sky, and the sound-recorder.

I was smiling so big by this time!  "This is perfect," I thought, "Thank you!"  Then, realizing the light wasn't only shining on the rocks, out loud I whispered, "Where's the rainbow?"


 I ran on top of my shelter (about 20 feet of solid rock higher), and saw to the southeasteast the gift I was looking for.  A double, very red rainbow.  I laughed with joy, even as the wind returned in force.  I was much more exposed up on top than I was twenty feet lower.  So I hurriedly composed and captured a 7-frame panorama of the scene, and headed back down, where it was less windy, to capture more of the sunset.

The sun slowly slipped away, and the dusk crept softly in.  The wind calmed, and the sky opened up to the northeast (the direction I would have to hike back).  I collected my things and headed towards the trail.  I walked as long as I could without turning on my headlamp, but eventually turned it on to make sure I was on the trail.  The hike back didn't seem to take nearly as long as the hike out.  The entire time, the storm stayed behind me and to my right, occasionally flashing and rumbling.  Ahead was clear.  The entire time, I was filled with gratitude for the gift of life, and the knowledge to never to fear.


Both my phone and myself are in top working order.  Thanks for reading!

Be well!

If you like my work, please consider purchasing a print, puzzle, mousepad, or coffee mug.  There are tons of beautiful print options at my printshop.  Until the end of August, use the code BlueMoon to receive a 50% discount off all purchases of $25 or more.

Tuesday, February 2, 2021

High Flying Sierra's


SierraAtTahoeSkiPhotography028, originally uploaded by navandale.
This is a fun photo from the 2011 season at Sierra at Tahoe, where I was a contract photographer through Flowskipix.
 
To get this image, I first set up my position on the corner of the knuckle (the rounded transition to the landing) so that I was not a hazard to anyone wanting to take the jump, but so that I could photograph people both coming towards me, and flying past me. It was a bright sunny day, and the sun was behind me to camera right. I could have easily set my camera to an open aperture (btw, I was using a Tamron 18-250 3.5-6.3 Macro Zoom) and been able to freeze the action with a fast shutter-speed...
 
...But anyone can do that... and I wanted to show a sense of movement. So, I cranked up my aperture to f14 (which allows me to worry a little less about focus) and slow my shutter-speed down to 1/125 at ISO 200 (I almost always shoot at ISO 200 in lieu of 100 when shooting people, because I enable highlight tone priority to maintain detail in the highlights).


Aside from being able to ski every day, I love being able to capture people doing awesome things like it's nothing. In order for me to make a living (*ahem), it's in my best interest to capture their awesomeness in a unique, eye-catching, clear, focused, and flattering way. I've created a flickr set that features a few of my other favorite images from this year, where I've employed techniques such as longer shutter speeds, sequence shots, and high-speed panning to get my money-making shots.


You may be thinking I'm crazy, that shooting moving objects at such a slow shutter speed will yield blurry images. Well, it depends. If I were to photograph a moving object coming towards or going away from me, a slow shutter-speed is a BAD IDEA... 

...not as bad as skiing without a helmet!


When the subject is moving parallel to me, I can pan with a slow shutter-speed, allowing the subject to be clear and in focus, and the background to be motion-blurred. Panning may take a little practice to get used to, and you will not always be successful, but it's a great way to make an action shot really come alive. 


 I've found that, depending on the speed of the subject, I can shoot at anywhere from 1/80-1/400 and achieve the desired blurry background and sharp subject. When panning, or shooting any moving subjects, have your camera set to AI Servo, and Full-Blast shooting (the icon with the "H" next to multiple frames).

Something to be aware of, however, is that if your subject is moving on any other axis in addition to their trajectory (i.e., if the bird's wings are flapping, the skier is spinning, etc.) those areas will not be as in focus with slower shutter-speeds.

I hope you enjoyed this tip, and have a great day!

Monday, February 1, 2021

Musica Animam Tangens - Catching Storms and Stars - Time Lapse Photography presented in 4k

Music touching:
Exhaling its breathless oceans of life currents
that free hearts giving love to all that open
the sounds that fill the mountain of my existence
and overflow my soul to touch
God. 

Musica animam tangens
Maria vitae effundens
Flumina cor liberantia omnes amore amantia
Musica sonans resonans
Implens meam essentiam
Meam inundat animam
Velut flunctibus montem submersum ut tangam 
Deum.

This video was three-years in the making.  I had the initial concept for it when I sang "Musica Animam Tangens" with the UNLV Chamber Chorale; the song painted images in my mind of the continual creation of the universe.  I was inspired by the imagery of Ron Fricke (Baraka and Samsara), and even the time-lapse imagery by District 7 Media (House of Cards intro). I wanted to bring the same level of image quality to my time-lapse photography as I do with my fine art photography (www.navandale.com), and so I present this video in 4k resolution.  Best viewed on a large screen with a good internet connection, and good speakers.


As for the technical aspects, most of the images in this video were captured with my Canon 60D, utilizing my tripod and shutter-release intervalometer.  As always, I shoot in RAW, and then convert the images to high resolution jpegs using Photoshop.  ...Well, some of the older sequenced images were captured as large jpegs, but that's because most time-lapse tutorials encourage capturing in jpeg to save space on the card.  The images in this video span over 3-years, over which time I've refined my technique to allow for full RAW capture of thousands of images.

My next project is to choreograph live music with time lapse and cymatic imagery.

Sunday, January 31, 2021

Travel, Magic, and the "S" Curve, Part 3.


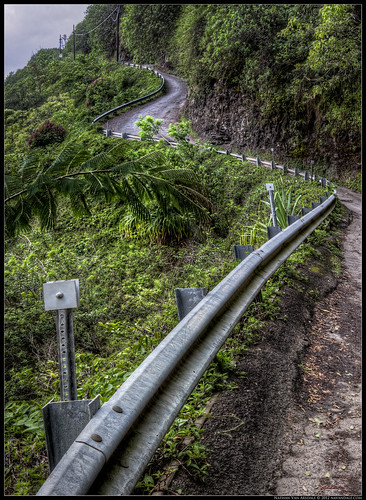
"Snake Road" Waipi'o Road on the Big Island of Hawai'i.  
This is Waipi'o road, the mile long (or so) stretch of road that snakes down 2,000 ft into the Waipi'o Valley. I have the utmost respect for the people that built this road! In places it's pitch is more than 30 degrees, and it is posted that only 4WD vehicles are allowed to drive on it. It is fairly difficult to walk down, and quite a cardio to walk back up. But the scenery at the bottom, and the view from the top are both well worth the effort.

I took this image on my way back up. The cloud-covered late afternoon light provided nice soft shadows. And the lovely "S" curve of the guardrail gave me a nice excuse to pause and catch my breath.  It should be noted that the horizon line is at about the third support for the guardrail.  I captured this at f11 to give a sense of the length vs height of the road ahead.

This is a Vertorama created from 3-horizontal HDR frames using Photoshop CS4. Each frame was created from 3-RAW images using Photomatix Pro.

The "S" Curve

Part of what excites me about doing what I do is experiencing the music of nature.  That is why I will almost never include man-made objects in my images, unless they completely compliment the landscape.  This rugged, steep road and blue-steel guardrail certainly added a since of balance and respect for nature against the lush forest backdrop.  I have so much respect for the people that built and maintain this stretch of road.  (Honestly I have loads of respect for most people who build most things!  I just find natural landscapes to be more pleasing photographic subjects).

I started noticing a few years ago how most of my better landscape images all exhibited a common compositional feature... the "S" curve.  I find this curve incredibly pleasing!  It is feminine, strong, organic, and powerful, and allows the eye to easily wander across the scene.  Often times I see S curves over the field of a large scene with a really up-close foreground, which is why many of my images are panoramas or vertoramas.  The beautiful thing about finding the "S" curve is that it immediately creates a balance... a yin-yang effect, if you will.  Just know, sometimes the S is more implied than others... but that's where we get into composition.


If You're already familiar with the Golden Ratio and Rule of Thirds, you can skip this section.  

Rule of Thirds
But let's start from the beginning.  Basic photographic composition requires knowledge of the golden ratio, or so-called "rule of thirds".  The golden ratio is present in all life, down to our very DNA.  It is predictable, fractal, simple and complex.  By recognizing the balance in a scene--often times we are recognizing mathematical relationships between objects of matter, light/dark, and/or color--we are recognizing the golden ratio.  The thing is, we are not always aware that that's what we're recognizing.  And thus, often times when we pull over to the side of the road to photograph something pretty... pull out our camera phones for a quick snapshot... or even take the time to go hiking with a tripod, we get images that are lacking in some way.  That's when we say, "Well, the image doesn't do it justice"...or..."well, you really had to be there."  By learning to look for this golden ratio, every image you take will be better!     
The golden ratio. 
DaVinci: Vitruvian Man
Here's a VERY unartistic, boring, mathematical look at a few combinations of the golden ration one can employ while composing an image (note, these are just a few combinations).  You can begin to see how combinations of this nautilus pattern will create "S" curves.  


Here's the idea put to the test.  This is an image I took a couple of years ago while hiking to Coyote Buttes (The Waves) in between Arizona and Utah.  Because this is a reflective landscape, it should already be symmetrical.  

In order to obtain this image, I rested my camera about an inch off the ground, and focused on the reflection in the water, rather than on the physical peaks of the ancient dunes (although the dunes are compositionally the focal point).  The other aspects of the image that I wanted to include are the bush, the two peaks to the left, and the frame of clouds.  Clouds are SO important when capturing landscapes.  Empty blue skies are just boring, and considered dead space.  You will NEVER see a professional landscape painting without an interesting sky.  

You'll notice that this image leads the eye from the peaks of the dunes either up to the sky, or down to the water (both following the arch of the clouds), and then finishes at the twin peaks and the bush.  This scene is well balanced from the foreground to the background; the curve of the golden mean leads the eye comfortably around the image, and is thus "pleasing to the eye."  

Here's another one of my older images.  This one was taken in Green Mountain Falls, Colorado about 4 years ago... before I really began to study composition.  This is one of those scenes that you walk by and can't help but be struck by its beauty.  The mix of autumn colors with silky water and frosty ice make for a beautiful image.  I feel like it's pretty easy to see gentle nautilus curve of the golden ratio in this image... but just in case, I went ahead and overlayed the nautilus. My focal plane includes the frosty tree and patch of moss on the right side of the image.  In this case you'll notice both how the golden mean is important in composing depth within an image, and how the lines of the nautilus curve and the rule of thirds can serve to frame internal aspects of the scene.  
See how the different sections of the overlay
correspond to individual scenes within the scene
"Hazy Shade of Winter" Green Mountain Falls, CO
In both sets of images straight, diagonal lines create a sense of movement through the image, leading the eye from one node to another.  You'll notice how in both cases the diagonal lines also coincide nicely with the arch of the nautilus curve.  

Earlier I mentioned that the golden ratio is both simple and complex.  It's easy enough to see how simple it is on a 2 dimensional plane.  But nature is NOT 2-D!  The golden ratio is present in everything, everywhere, all at once... and everything is ALWAYS changing... Super complex!!! Recognizing the pattern often just requires a shift of perspective, a different focal-length, a different lens (Don't bring the camera up to your eye... bring your camera into the scene, then bring your eye to the camera).  

To compose with the golden mean, usually finding a diagonal line that leads from one interesting area of the scene to another, and spans the length of the frame (at least implicitly), will do the trick.  That diagonal line will help lead your eye from the main point of interest (which will usually be an extreme foreground object and focal point), to the secondary point of interest further in the background.  You'll notice that most of my images have a focal object that is roughly equidistant from the edge of the frame to the edge of the diagonal.  Keeping the focal object away from the edge of the frame, and away from the center of the frame (rule of thirds) will heighten your chances of creating a dynamically composed landscape image.  This busy overlay shows how there are many leading lines of composition, and that each focal point in the scene begins a new nautilus curve that leads the eye to the next focal point, and then back again.  The shiny, metallic reflector on the lower left invites the eye to examine the metal guardrail, which leads up the leafy, cracked road to the next reflector.  The eye is then lead up to the top of the road to the power lines, and then descends down towards the large fern branch, which pours the eye back into the beginning of the scene.

The "S" curve

The "S" Curve Continued

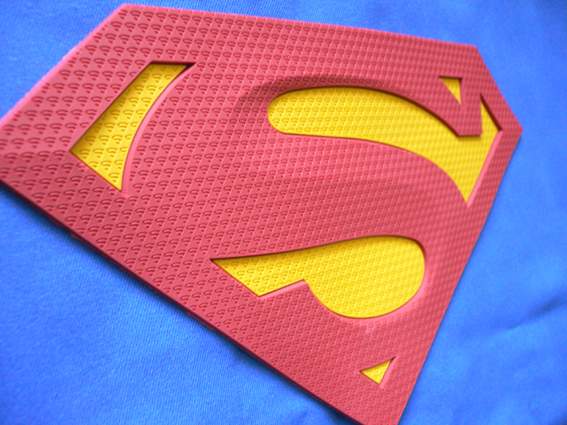
That brings me to the "S" curve (finally).  Having an object, or a series of objects, create an "S" shape (often similar to Superman's Emblem) will automatically make your photograph conform to the "math of beauty" without you needing to actually do any math.  I don't think it's necessary to look solely for an "S" curve while out in the field, because that would be incredibly limiting.  But, it IS necessary to look for balance while composing a photograph.  Don't let the term "S" curve confuse you either... not always will the curve look exactly like the letter "S!"  Often times the curve is implied from the relationships of other compositional variables (i.e. foreground object, mid-ground object, background object, areas of light vs. dark, etc), and is in the shape of a question mark, or W, rather than an S.  The "S" is not necessarily a 2 dimensional (x and y axis) shape, but conversely often reaches from the front to the back of the scene along the z axis, leading the eye around the image.

Thanks for reading.  This concludes part 3 of my three-part series Travel, Magic, and the Letter "S."  If any of the concepts I discuss are confusing or new, please visit previous posts for clarification, or feel free to drop me an e-mail :-)

If you like my work, please consider either donating or purchasing one of my fine art prints.  Just head over to http://nvaphoto.smugmug.com/, and enter the code BlueMoon to receive a 50% discount on all print orders over $25.  The Offer ends at the end of the Month!  

If you'd like to suggest a topic for me to write about, I'd love to hear from you... just leave a comment below.  

All the best!  Be Well! :-)

Saturday, January 30, 2021

Travel, Magic, and the Letter "S," part 2

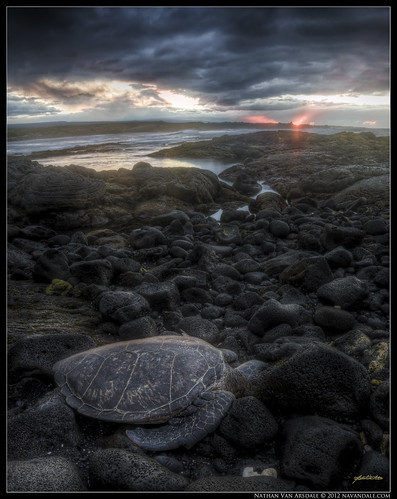
Honu Magic at Punalu'u Beach, Hawaii


This morning at Punalu'u beach I was a bit distraught! The previous morning my camera lost all of its electrical functions... no LCD, no autofocus, no white-balance, no changing of ISO, no AEB! All I had use of were its mechanical functions, i.e. changing the aperture and shutter-speed, and depressing the shutter. I had no idea if the images I captured were actually being captured and recorded on my CF card. Fortunaltely, I could still determine the exposure, and adjust my settings accordingly. What made it all the more difficult is that as I increased my f-stop, my view-finder darkened, making it near impossible to focus on anything above f13. So, I had to dial my aperture down, manually focus (a huge challenge for me since I wear strong corrective lenses), and then dial the aperture back up. Without an auto-bracket funciton, I had to manually adjust my exposure +2 and -2 for HDR images.


HDR Pano of  stair-step falls captured during my
camera's haitus.
Here's a macro HDR of a Red Tower Ginger,
Captured by my dysfunctioning camera.  
A wall of jungle!  An HDR of Beautiful Parakeet Heliconias.
Also captured while my camera was being uncooperative.
I had just arrived in Hawaii, and would be there for over a month. I couldn't send my camera in to Canon, because then I would be without it for the duration of my stay. I decided to look at this as a challenge, and utilize my photography knowledge. After shooting with my defunct camera for a day, I was able to at least find power, lug my computer in, and check my CF card.  Pfew!  Fortunately the images were being written to my CF card... albeit they were all rotated 90 degrees from their correct orientation... but they were being written!

So, this morning I was walking the black sand/black rock coast, looking for interesting compositions for the soon-to-be sunrise, and I came upon this honu (sea-turtle), resting on the rocks. It is illegal to touch or disturb sea-turtles in any way, so I made sure to keep a comfortable distance... but I couldn't ignore the compositional opportunity. I quietly asked the gentle reptile if I could photograph it, and slowly it turned and looked at me with ancient eyes, blinked, and rested its head back where it was... just then, my camera beeped five times (a sound I've never heard it make), and all of the sudden the electrical components were restored! Nearly overcome with joy, I photographed this sea-turtle, thanked it, and continued on my way!

This is an HDR panorama from 2 HDR images, each created from 3-RAW images using Photomatix Pro and Photoshop CS4

A Note on Composition:

I suppose it's tempting, when encountering an animal in the wild, to focus just on the animal.  That is, to fill the frame with the animal, or try to get a photo with it looking at the camera.  Granted, I've certainly taken my fair share of photos of animals looking directly at me, where the surroundings are somewhat ancillary.  But I usually try to at least photograph the animal(s) as part of the landscape.  This scene, however, spoke to me in a much different way.  The turtle was looking into the sunrise, which was shaping up quite beautifully... explosively even.  If I were to photograph this turtle head-on, I would be missing out on the beautiful sunrise.  Also, were I to photograph this scene with a single exposure, either the turtle would have been very dark, or the sky would have been blown-out.  Granted, usually when photographing wildlife it's a good idea to employ a zoom lens, low aperture, and relatively fast shutter speed.  However, since the turtle was so still I could use my 18mm wide-angle lens and get pretty close, allowing for the inclusion of the shore, surf, and sky.

The beautiful sky had two components that I wanted to capture, the rising smoke from Kilawea (on the left), and the sunburst (on the right).  What isn't as apparent is that I am backed up to a wall of gnarly rocks, so I don't have much room to maneuver.  So, in order to make angles on the turtle, the smoke, and the sunburst (at 18mm) proportionally and compositionally pleasing, I had to shoot for a panorama. This would be an easy pano, though.  Only 2-vertical frames that overlapped about 60% of each other.  I lined up the turtle's gaze to coincide with the "S" curve from the tidewater to the sunburst.

So happy that I could again access my AEB (Auto Exposure Bracketing), with my camera on its tripod and using my shutter-release, I auto-focussed - :-D - on the edge of the turtle's shell, then turned the autofocus off.  At that point I fired my bracketed shots at f20.  I then recomposed on the same horizontal plane a little to the left to include the volcanic smoke, and took my bracketed images at the same exposure levels.  

I decided to use the turtle's gaze as a compositional tool, leading the eye to the tidewaters, and then to the sunrise.  That way we're looking at what the turtle is looking at, AND, as a photographer, I'm not getting in the animal's way.  

It's very important, in my opinion, to always ask the animal's permission to photograph it, and then thank it when finished.  Granted, the animal can't verbally acquiesce, but I feel like communicating that intention with the animal generates a sense of mutual respect.  Never EVER feed wild animals, or try to touch them... not even chipmunks... animals may be cute, but treating wild animals like pets can be very detrimental to their health... but ALWAYS lovingly respect the animals.  I am very grateful to be able to experience nature and share its splendor by creating artistic photographs, and leaving only footprints.  

That's all for today.  Thanks for reading.  Make sure to check out part 3 of Travel, Magic, and the Letter "S," where I talk about discovering the S curve in landscape composition.  

Be well!

Like My Work?  Help Support it! 

!!!PRINT SALE!!!

Happy Blue Moon! This August starts and ends with a full-moon. In Celebration I am offering 50% ALL print orders. This includes cards, wall-mounts, canvas wraps, metallic prints, and downloads of all fine-art landscapes AND portraits!

If you book a portrait session with me during August, I will extend the discount for a week after your images are made available.

Just use the coupon code: BlueMoon

Friday, January 29, 2021

Travel, Magic, and the letter "S." A 3-Part Blog. Part 1.

Blue Moon: Antelope Island, Salt Lake, Utah.


Happy Blue Moon!

Seeing as how I only post to this blog once in a blue moon, I feel it's fitting that August is a blue moon month.  To celebrate the celestial occasion, I am offering 50% off all of print purchases through the end of the month.  Just go to my printshop and at checkout enter the code: BlueMoon.  

I feel, in a way, as though I should apologize for the infrequent blog posts... but conversely, I don't want to just blog for blog's sake.  My goal with this blog is to provide useful photo tips, inspiring and/or humorous anecdotes, and to share my images.  I became a much better photographer because of the myriad bits of free information provided by other photographers (such as David Ziser, Trey Ratcliff, Scott Kelby, etc.), and I, too, want to share with others what I have come to understand through experienced practice and application.


That being said... what a time I've had over the past few months!  I performed in Opera Las Vegas' production of Don Giovanni as the Commendatore with Metropolitan Opera Musical Director Greg Buchalter, Metropolitan Opera Stage Director Jonathon Loy, and Met singers Philip Horst (Leporello), Jeff Mattsey (Don Giovanni), Amy Shoremount-Obra (Donna Anna), Luana DeVol (Donna Elvira), and Mark Thomsen (Don Ottavio).  I performed with the Palm Springs Opera Guild's outreach project, where I was able to sing for hundreds of elementary and middle school children each day for two weeks.  I passed all of my master's courses at UNLV with flying colors.  And on my birthday I sang a well-attended recital followed by a very successful art show.  Most recently I spent a month in Hawaii singing with the Hawaii Performing Arts Festival on the Big Island, where I performed as Sarastro in Die Zauberflöte, in addition to singing in concerts and cantatas.  I just got back to the mainland a couple of days ago, and brought back about 200GB of images just waiting to be processed!


Part 1: Travel 
My rule when I fly is to never check my camera.  However, when I flew to Hawaii I had so much luggage (my computer, music scores, performance clothes, hiking clothes, portable portrait studio, guitar...), I had to make the hard choice to check my camera in lieu of carrying on my music scores and guitar.  Well, Murphey's Law prevailed, and my flight was delayed leaving Las Vegas, which put me into LA at the moment my connecting flight left for Kona.  I had to take a different flight to Honolulu, where I was put up for the night, and then fly from Honolulu to Kona the next morning.  When I arrived in Kona, my bags did not!  Worse, when the customer service agent re-booked my flight out of LA, they took my baggage claim stickers, so there was no way for the people in Kona to track my bags and let me know when they would arrive!

The Observed: Mauna Kea, Hawaii.  For this image
I didn't even need my shutter-release cable.  Just
30-seconds at f2.8 ISO 800.  
Well, I waited near the airport for a few hours, then drove around Kona for a while, trying to be patient until my camera and clothing arrived... after all, there ARE worse places to have to wait.  Finally, after 12-hours I got the call that my bags arrived!  I picked up my stuff at 19:45, and headed straight up the saddle road to Mauna Kea (the tallest mountain on Earth from its base under the ocean).  I got up to the summit around 22:00, and was surprised at how blasted windy and cold it was!  I quickly grabbed some warm clothes out of my suitcase, and set up my tripod... then grabbed more clothes, because it was COLD!  Fortunately, I always keep gloves and a beanie in my duffle bag.  The moon was at about half that night, but at that altitude it provided more than enough light.  I was amazed at how clear the milky way looked... more clear than from the mountains of Colorado or Wyoming!  I captured some beautiful images of the night sky, and then packed up and headed towards Hilo for a little warmer weather...

Rainbow Falls: Hilo, Hawaii.  It was rainy and
windy, so I had to be patient and protect my
camera to get a sharp image.  
Hilo was rainy and cloudy when I arrived, but that, to me, wasn't a bummer.  The sky was lit up a beautiful orange and purple from the reflected street light.  I decided to take advantage of this opportunity to capture Rainbow Falls in a different light than I've ever seen; every photo I've ever seen of Rainbow Falls is a daytime photo.  Normally, if the sun isn't obscured by clouds, the spray from the falls creates a rainbow during the morning.  The Hawaiian word for rainbow is Anuenue, which, to me, is a much more beautiful and appropriate term for the beautiful band of refracted light.
So, I arrived in Hilo around 1:00, pulled into the empty parking lot, walked the twenty-or-so steps to the falls lookout, and accompanied by a few curious ferrel cats I captured the falls.  It took a few tries to balance the light of the sky with the falls, and I eventually ended up "painting" the falls with my headlamp.
My original plan was to find somewhere nearby to camp until dawn, at which point I would then photograph the waterfall with its morning rainbow, but it was raining so hard that I decided, instead, to head down to Volcano National Park to get some night photos of Kilawea.

Halema'uma'u Crater: Volcano National Park, Hawaii.
I made the hour-and-a-half-long drive down to Volcano National Park, and made my way to the Halema'uma'u Crater at the Kilawea view area. At this point I was pretty tired, and ready to find a place to sleep.  But the orange glow was calling to me, so I exited my car and walked over to the view area to snap some photos... I honestly wasn't that impressed... I couldn't actually see into the crater, and the images, to me, looked like nothing more than long exposures of a campfire.  Although, yes, it was cool to be standing on the edge of an active volcano.  I was also a little peeved because there was a bit of construction going on, which prevented me from exploring as much as I wanted... and it was STILL raining, which made the prospect of finding a decent campsite all the more daunting.  Maybe I would just sleep in my car... but not in the visitor center parking lot.  Since I was in Volcano National Park, I figured I'd drive down Chain of Craters Road to the trailhead for the Pu'u O'o lava flow.  I arrived at the end of the road around 3:30, and decided to just sleep in my car until 5:00 so I could photograph the lava flow with the rising sun... 


Night Photography Tip:

Obviously, when capturing images at night, there is not a lot of light.  If you should use a tripod during normal landscape photography, you should DEFINITELY be using a tripod for night-photography.  Seems logical enough, but I actually know people who have tried capturing star-trails by placing their camera on a picnic table and holding their shutter button with their finger.  First of all, that would get really boring, really fast.  But secondly, there is no way you can compose a sharp image that way.  So ALWAYS, ALWAYS, ALWAYS use a tripod... otherwise, why even try?  

Observatories at Mauna Kea use lasers to target distant stars during twilight. 
Calculating a proper exposure can be tricky depending on the phase of the moon, your altitude, the amount of atmosphere, etc.  Most newer DSLRs can photograph at a pretty high ISO without a lot of noise.  I don't have one of those cameras.  My 40D gets pretty noisy at ISO 1600.  Typically, if I want to photograph the milky-way, or any other night scene that doesn't involve star-trails, I shoot at ISO 800, f2.8 at 30 seconds.  With a 5D Mark II I could easily shoot at ISO 3200 for 30 seconds and get a much more defined Milky Way... so know your camera's sensor and shoot accordingly.  When photographing man-made light sources at night (cities, buildings, campfires, etc.), normally I have to quicken my shutter speed so that I avoid too many blown-out areas.  When photographing star trails, you have the choice of using your shutter-release cable and shooting a really long exposure, or shooting multiple 30-second exposures that you can later blend in photoshop for ultra-sharp trails.  I actually prefer the lighter sky that I get with a ten-minute, or so, exposure.  When shooting star trails, I dial the ISO back to about 200, and using my handy-dandy exposure calculator app on my droid, I can easily figure out how long to set the exposure at the lower ISO.  The image above is actually an HDR image created from 3-RAW images.  I wanted to show how clear the moon was, while still seeing the cool details of the sky and catch-light on the observatories.  You'll notice that since it's a combination of 3-images over the course of 50 seconds (30s, 15s, 4s) at ISO 100, that the final HDR image actually shows small star trails.  

Pu'u O'o lava flow on the Big Island of Hawaii.  
Focus can also be tricky with night images.  Autofocus will not work!  Therefore you have the choice of either setting your focus manually to infinity for a really sharp sky, or even better, using a light to illuminate a foreground object long enough to bring it into focus.  If there is any moonlight, the camera will expose the foreground and create a really stunning night photograph (nothing is worse than an out of focus foreground).  The above image of the Pu'u O'o lava flow provided enough light on the foreground that I was able to easily focus on the edge of glowing lava where it meets the dark rock without the need of a headlamp or other light.  This is actually a panoramic image merged from 4-images, two for the foreground, and two for the sky. Obviously, like when photographing a campfire and night sky, the fire is MUCH brighter than the stars.  While taking these photos I experimented with a technique called "black cloth," wherein I covered part of the image with a piece of dark material for most of the exposure, allowing for a balanced exposure (in this case, I covered the lower part of the image containing the lava, that way the ground wouldn't be too bright).  

I hope you found these tips useful... and if any were confusing, I cover everything I talked about in greater detail in previous posts, so feel free to explore my blog.  

Make sure to check out Part 2 of Travel, Magic, and the letter "S," where I talk about magic.  

Until next time.  

Be well!  :-)
Aloha!


Thursday, January 28, 2021

New York State of Mind

I was recently flown to New York to sing in the premiere performance of Virko Baley's modern opera, "Holodomor: Red Earth. Hunger." starring John Duykers, Laura Bohn, and my voice teacher, Tod Fitzpatrick.  The performance at the Gerald Lynch Theater at the John Jay School of Criminal Justice was very well-received with a very nearly packed house.  It was such an honor to be able to share the stage with such amazingly talented musicians.  Most of my time in the city was spent rehearsing, but I was able to steal a few hours here and there to have fun with photos.  

I wanted to photograph the oh-so-cliche view of the New York skyline from the Brooklyn Bridge, but I was unsure if I wanted to include the Manhattan Bridge or not.  I took a taxi from Times Square to the Manhattan Bridge (Bk side), figuring I could have it frame the City and the Brooklyn Bridge.  


No dice.

The sun was setting so far south, and I really wanted it in my composition, so I walked the short distance to the little park by the Brooklyn Bridge, and was rewarded with this lovely composition.  


The New York City Skyline at the Brooklyn Bridge during Sunset on a Cold February Evening. This is a Panoramic stitch of 5-HDR frames.  Each HDR frame was created from 3-RAW images using Photomatix Pro and Photoshop CS4.

After the sun descended below the horizon, I felt I should start heading back to the other side of the river.  I figured the Brooklyn Bridge had a foot-path, but wasn't sure.  After walking a short distance, my supposition was confirmed.  From atop the Brooklyn Bridge, I could see everything!  Manhattan, Brooklyn, the East River, The Stature of Liberty, the Manhattan Bridge... and I loved how the arches of the bridge complimented the city skyline.  This sunset was turning out to be exceptionally beautiful, with the gradient stretching across the city, headlights passing by underneath, city lights turning on, and the American Flag proudly raised straight ahead.  So, I set up my tripod (narrowly, so as to avoid passers-by), and captured this HDR panorama.  There were, as I said, passers-by, so I had to do some selective masking when it came to processing the bridge... But I decided to leave the tourist taking a picture of the American Flag (in between the Light pole and archway... easier to see when viewed large).  There are so many blue tones when photographing this city, the warmth of the sunset and streaking car lights added just enough red and white to give this image a distinctly American feel.  


This HDR Panorama of New York City from the Brooklyn Bridge consists of 7-horizontal HDR frames.  Each HDR frame was created from 3-RAW images using Photomatix Pro and Photoshop.


I had a limited amount of time to explore the city, due to an arduous rehearsal schedule.  The next time I was able to get out was the night before my performance.  My dear friends at the Metropolitan Opera were able to get me comp tickets to see Rigoletto that night, so I had to be at the Met by 7:00.  My rehearsal got out at 4:30... enough time?  The sun set was scheduled for 5:15, surely I had enough time to make it back to my hotel, grab my gear, and get to the top of the Rockefeller building.  There was, as expected, a bit of a line to get to the top.  I thought it was funny that normally when I chase sunsets it's through the wilderness, trying to get to an advantageous spot for compositions.  This time I was chasing the sunset, but rather than contending with wilderness, I was contending with civilization (my least favorite activity is waiting in lines).  I must say, 30 Rock is a pretty impressive place!  Lot's, and lot's of money went into this building!  

The elevator ride up to the top was pretty cool... the ceiling of the lift was clear, and once the doors closed, the lights turned out and we could see up the shaft.  The shaft was lined with blue lights, and a neat video was projected on the clear ceiling, so the ride up looked like being launched on a raptor from a Battlestar.  

I made it!  It was 5:10, with the sun about a hand's width above the horizon.  

Up top it was COLD!  and Windy!  Fortunately, I was prepared for both.  Unfortunately, I wasn't prepared for the dust and smog in the atmosphere.  My eyes could do little more than squint without watering uncontrollably.  I patiently waited for the other tourists to move away from the wall so I could set up my tripod, then I claimed my spot (in my opinion, the one decent spot for sunset photography on the whole roof due to obstructions everywhere else).  In between blinks and eye-rubs, I was able to capture a few bird's eye shots.  


You can see the dust and debris in the atmosphere.  Notice the purple and green hues in the sky?
That's what we breathe :-/
Tetris, anyone?!
The New York City Skyline with the view of the Empire State Building, Statue of Liberty, Both Rivers, and a ton of buildings!  This is a panoramic stitch of 4-horizontal HDR images, each HDR images was created from 3-RAW images using Photomatix Pro and Photoshop CS4. 
Not only was I able to enjoy a beautiful sunset from the top of the Rock, and watch the city come alive with lights, but I made it to the Met in time for the performance.  And what a wonderful production it was!  I am so grateful to have such wonderful friends and opportunities!  

The next day was our performance of "Holodomor: Red Earth. Hunger."  It was fantastic!  The auditorium was packed, all of the musicians sounded wonderful!  It was really the best we'd sung since receiving the music three weeks earlier.  Afterwards we all celebrated.  A long-time friend of mine was able to attend the performance, so he joined us for the night too.  I chose not to drink too much, since I knew I had an early day the next day... but before I knew it it was nearly 3:30am, and I had so much energy.  So, I decided to take advantage of the opportunity, and I went on a little photo-walk.  There's nothing like walking through the streets of New York at 4:00am, because no one is out.  Where there would normally be crowds potentially tripping over my tripod, there was empty sidewalk.  So I was able to have some fun with compositions.


"Batman's Gotham"  This is an up-view of some Madison Ave buildings and corporate art. 


Find Your One Time.
This is a fisheye vertorama of Times Square from 43rd St at about 3:30am.


I managed to leave New York just before the huge snowstorm hit.  I've been back in Vegas now for over a month, incredibly busy with my Masters of Music studies.  Currently I'm performing as Dr. Dulcamara in Donizetti's Elixir of Love (March 15, 16, & 17 at UNLV).  I'm also slotted to perform at this year's Classical Singer Conference in Boston, in May, and will be performing with Sin City Opera at Vegas' Onyx Theater, too.  Soon I will have completed my studies, and will once again be able to visit more exquisite landscapes.  Until then, enjoy these Cityscapes, and be well! :-)