Sunday, May 29, 2011
Whiskey Skies
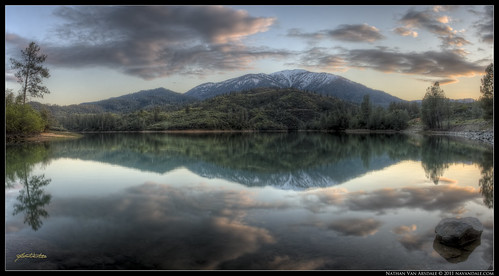
Spectacular sunset over the Oak Bottom arm of Whiskeytown Lake. This was my stop after leaving Redwood National Forest on my National Park trek. I wasn't actually expecting anything special to come from Whiskeytown National Park (in comparison to many of the other National Parks I have seen and would see). That thought was stoked by the fact that the waterfall that I had wanted to visit and photograph had all sorts of trail-construction.
On my approach to Whiskeytown through Willow Creek, I could tell that the sunset was going to be beautiful... But, I was surrounded by canyon walls, and really wanted a shot with Shasta Bally in the background. Well, as I exited the canyon and rounded a bend I saw this scene... I had to stop! Fortunately, there was a campground parking lot about 50 meters ahead. I pulled in, parked, and rushed to get my camera and tripod.
In my flip-flops I navigated the steep, thistle-covered bank to the shore-line. The shoreline didn't offer much in the way of foreground... all there was was a lonely rock far off to the side, which only offered one angle of view (lest I include the man-made embankment that made up the northwest shore). I considered photographing the scene with just lake and sky, more of an exact mirror, but it just wasn't as interesting without something in the foreground. So, I got my tripod folded wide open to allow for a nice low angle on the rock, and still see enough sky. The only available angle from which to shoot the foreground, not get the man-made embankment, but still see the clouds and mountains required that I put the legs of my tripod in the water, and I squat in a smelly mud. I took a series of shots as the light quickly changed, but this image was the first I captured, and the best of the evening.
The only way to capture the completeness of the scene was to shoot it as a panoramic. This is an HDR pano made from 4 horizontal frames. Each frame is an HDR image created from 3 RAW images using Photomatix Pro. Pano stitched in Photoshop. Very little post processing was done to this image. A little dust-spot stamping, unsharp mask, and noiseware standard in the sky.
Enjoy, and thanks for visiting! :-)
Sunday, May 15, 2011
Drinks, Snacks, and Violence... all in a Beautiful Day's Work
My recent trip to Yosemite Valley yielded some awesome photographic opportunities, as well as some unforgettable encounters. Here's a couple images and anecdotes from that trip.

Ahwahnee
View of Tissayak (Half Dome) and North Dome from the Ahwahnee Meadows in Yosemite Valley. The Paiute legend that I like (there are a few versions, and even some controversy over wheather it is a Paiute or a Miwok legend) states that a young girl and her husband were out from Mono Lake and were very thirsty when they entered Yosemite Valley. The young girl was so thirsty that she drank up all the water in the valley, angering her husband to the point of beating her. As she tried to run away she threw her basket at him, but then fell down and began to cry. To punish them for bringing anger into a place of peace and beauty, the creator turned them into stone, the woman forever weeping: Tissayak. Her Husband: North Dome. Her Basket: Basket Dome. Her tears still streak the face of Half Dome.
Sometimes the scene is just too big for the lenses I have, so... I cheat. This is an HDR-pano from 4 HDR images, arranged in quadrants. Processed using Photomatix Pro's Batch Processing, and Photoshop CS4. It's pretty easy to stitch pretty much any number of images together using photoshop's "Photomerge" option. It only requires a little bit of foresight when capturing the images. Make sure there's about 30% overlap per frame, and with just about any focal-length you can make grand panoramic stitches (as long as the "correct geometric distortion" box is checked). Just make sure to shoot more than just the intended scene, as you will need to crop the slightly warped edges of the final product.

Lunch Munchin
On my hike up to Nevada Falls, I stopped to admire the beautiful rainbow created by the angle of the sun against the spray. Apparently, I wasn't the only one enjoying the scene. This little ground squirrel stayed still for the entire time it took me to consider the shot, wonder if the squirrel would stay put, and set up my tripod... about a minute and a half in all. Then, as soon as I took my bracketed shots, the squirrel looked up at me and scurried off.
It's both cute and annoying how accustomed to humans some "wild" animals are. Every National Park has signs posted on trails admonishing against feeding the wildlife. Not only can the non-indigenous food cause myriad health problems for the animals, but the animals can most certainly cause health problems for humans. These cute critters carry lice, ticks, fleas, other parasites, rabbies, and other diseases. This squirrel was eating what looked like a torn of bit of a granola bar... probably no big deal... but before you know it, this squirrel will be dependent on handouts and be unable to fend for itself (...hmmm, is there a hidden socio-political statement in there).
Thanks for reading. Be well! :-)
Sunday, April 24, 2011
Morning Song

So, I hopped on my bike, and enjoyed a beautiful ride to this spot. I stopped along the way a few times contemplating striking compositions, but I didn't dally for fear that the fog would lift, and I'd miss the color in the clouds. Well, I arrived at this bend in the river, and carefully moved from rock to rock, careful not to disturb the fragile flora along the bank, until I had the composition I wanted. Honestly, I was hoping for something more interesting in the foreground... but I'm not complaining.
Yosemite Valley is a magical place, and this morning was no exception. With the songs from all of the birds providing a melody on top of the melisma of the moving water, and the occasional crescendo and decrescendo of wind, I had no need for any ipod or other musical device during my stay. This image is but one of many taken during my stay in Yosemite, and can be purchased as a fine art print, puzzle, mouse-pad, coaster, coffee-mug, etc. at my printshop.
Now, Let's talk about Stability and Camera Shake.
To take this image, I used my brand new Manfrotto 055XPROB Pro Tripod with the Manfrotto 322RC2 Joystick Ball Head. Sure, I could have used any tripod, but I am super excited about this thing. It is a carbon fiber magnesium allow, so it's super strong, and super light-weight. Not to mention, I have full-360 degree rotatability, greatly expanding my shooting options compared to my old, heavy, unsturdy aluminum tripod. Then, with my Canon 40D
Thanks for reading! Be Well!
Wednesday, March 23, 2011
Thy Rod & Thy Staff

Shepherd, originally uploaded by navandale.
"Yea, though I walk through the valley of the shadow of death, I will fear no evil: for thou art with me; thy rod and thy staff they comfort me." Psalm 23
This image is an "abstract" photo I took of some icicles. I love discovering transcendental features of the everyday or mundane. I chose this image for this blog post because I took it when I got home from the story below. Something as simple and abundant as water can become ignored as white noise, as is the case with many things in life... but as is the case with most everything, when examined under the meditative, inquisitive, photographic lens, new layers and emotions emerge. Photo specs, f5.6 1/200 ISO 250. Contrast adjustments in Camera RAW.
I'm not dogmatic in my spiritual beliefs, and I don't often write about them online because of the myriad understandings of the same words, and people's sensitivity towards their attachment to those understandings. But I think I have to share what happened the other day:
I quite enjoy when I can witness the Universe working through/with people. In my own practice, I have felt/perceived extreme connection and universal oneness, but usually through meditation. But on this day, I wasn't trying... I was just enjoying myself, skiing as I have done nearly every day this year at Sierra at Tahoe. On this day, I was placed in the exact right place, and at the exact right time. Though anyone in my place would have done the exact same thing, I am humbled to have been put in the situation to save a man's life.
It was a very snowy powder day, and I was deep in trees on a run that I never ski--I had been making laps on one of my favorite routes, but when I got off the lift this time, I found myself for some reason turning down the main run. I turned off of the main run into the woods, only occasionally coming upon other tracks. It was great powder skiing, but I felt the urge to stop, so I did. Ten feet away in a tree-well I saw a sliver of black sticking out of the snow, just about 3 inches of the edge of a ski. I figured I would retrieve the ski and bring it to Lost and Found. Then I noticed the tip of a ski pole mixed in with the hanging, snow-covered branches of the tree. At this point I stopped thinking.
"HEY, ARE YOU OK!!!" I shouted at the realization that someone was likely buried in that tree well. Three more times I shouted, "HEY, ARE YOU OK?!?!?" Then I saw the ski move a little with a kick, confirming that someone was indeed buried, and that they were at least conscious. I started to move closer.
I should point out that this year the Sierra's have received more snow than they have in at least 15 years (according to local friends). Maneuvering on mountainous terrain in chest-deep snow is NOT easy, even with awesome powder skis like what I have (K2 Kung Fujas
As I moved closer, I continued shouting, and to my surprise and delight he replied, "I'm OK!"
"Keep breathing." I said, "Are you injured?"
"I think I'm ok, he said, but I'm stuck and can't breath. I can't move my legs." He kicked his leg a little, showing how pinned he was.
"Don't try to move." I shouted. "I'm going to get you out of there... but first I need to dig down to you."
I stomped out a platform to take off my skis close to the tree well. Once I unclipped, I sank down to about my waist, and used my poles and skis to keep myself supported.
"What's your name?" I asked.
no reply
"HEY, I'm going to unclip your skis, OK?" I shouted.
"OK" he softly replied.
I had no idea how long he'd been buried. But I knew that every second of a claustrophobic situation like that feels like an eternity. I unclipped his ski, and continued talking to him... if anything just to let him know I was there. His other ski was still on his other foot, buried about 2 feet below his showing ski. I reached through the snow, and once I found his release lever, I unclipped his other boot. The sense of relief was palpable, but he was still really stuck. He was still buried in a cage of frozen branches with his head downhill.
I told him I was going to have to dig around the tree to where his head was. So, with snow up to my chest I forced my way around the tree, half-digging, half-bull-dozing. I kept talking to him, letting him know I was getting closer. I made it around the tree to where I heard his voice, and started digging. About 3 feet down, and I still don't see his head. I found his arm, and grabbed his hand. It was more for reassurance than for anything, but he pulled at it as though he was grasping at straws. He was really stuck!
A snowboarder appeared about 20 feet away and shouted asking if everything was ok. I told him to go tell Ski Patrol, that there were no apparent injuries, but to come quickly. I gave him landmark details that would let Ski Patrol find us easily. After a minute of hesitation, I told him the quicker the better, and he left.
I continued digging.
Then... Finally. I felt his goggles, and then quickly went to clear the snow over his face. He was face up! I'm so happy he didn't drown! His goggles were loaded with snow. "Try to take slow breaths and don't move," I cautioned, "because were not done yet." I had basically borrowed a hole to his head, leaving walls of delicate snow all around. Any movement would surely send snow avalanching back onto his face. "My name's Nathan, what's yours?"
"Jim" he replied gratefully, "and thank you Nathan."
"Jim, I've still got a bit of digging I have to do... some snow might fall back in your face. Don't panic if that happens. I know it's been a dark and hard to breath. Just stay calm, and I'll get you out of here in a sec."
A little snow did indeed fall and re-cover his face... but it was easily brushed away. The snow around his helmet was nearly cemented, which made it impossible for him to move his head, and difficult for me to dig him out. I also wanted to be careful not to aggravate any potentially damaged bones. After another few seconds, though, I had enough of his upper body dug out that he could move and wriggle to a manageable position.
Taking the snow-filled goggles off his face he sighed, "OOh that's a scary movie." and then paused for a moment of reflection. We tried in vain to find his other pole, all the while chatting. He thanked me numerous times by the time I gave up searching for his pole, telling him, "Well Jim, I think we should chalk this pole up as a sacrifice to the snow Gods."
This whole ordeal took about 20 minutes from the time I first noticed his ski. I asked him how long he'd been down there before I arrived, although I know it probably felt like forever. He estimated about 2 minutes. With the rate of snowfall we had, another two minutes and his ski may have been completely covered. Aside from the snowboarder who stopped when he saw me digging, only 2 other people skied by within 30 feet.
I am sharing this story, because I am so grateful for the way angels, the universe, God, the Source, biochemical-electromagnetic-gravitational forces, etc. steer us from time to time. I don't think that what I did was heroic, or deserving of any accolades, but simply the necessary thing to do in the given circumstance. I am sharing this story because I hope it inspires you in some way.
Saturday, February 19, 2011
Be Prepared, Even if You're Unprepared
 |
| "Fallen Leaf Falls" |
The other day I arrived home a little earlier than usual... well, a lot earlier than usual. It was noon, and a beautiful day. I didn't feel like sitting inside and playing on the computer, and I happen to live (at the moment) in one of the most beautiful places on Earth, South Lake Tahoe, CA. So, I decided to have another photo-adventure. My neighbor informed me of a waterfall near Fallen Leaf Lake, a beautiful glacial lake next to Lake Tahoe, and said it was about a 30 minute hike.
Eager for the adventure of newness, I grabbed my case-logic camera bag , tripod, and set out towards Fallen Leaf Lake. However, since it's winter, Fallen Leaf Lake Rd. was closed (a fact I found out upon reaching a gate). No worries, I'm always up for a bit of a nature walk. Of course I realized that this unexpected turn would likely add a bit of time to the 30-minute prediction.
It was a warm walk through melting-snow-covered cedar forest, but once I got to the lake, the wind picked up. This made me incredibly happy, because that meant snow was blowing in, and I LOVE when it snows. But, that also meant I had to pick up my pace, because I didn't want to be caught in the snow after dark, and the sun was getting lower in the sky.
Well, after about an hour and a half walk, I arrived at Glen Alpine Creek, which empties into Fallen Leaf Lake. I love waterfalls, and natural bodies of water in general, so I was very excited when I saw the size of the waterfall. It was huge, covered in ice and snow, and picking up a beautiful glow from the light of the clouds. The deep snow around the rocky bank made for some very precarious positions on my part. I hustled all over the place trying to find good angles, while at the same time not getting footprints all over the foreground.
DRATS!
I only brought my Tamron 18-250 lens, which was just not wide enough to capture the whole scene from where I needed to be. Normally I would also have my Canon 15mm fisheye lens, but I neglected to throw it in my bag. This meant I was going to have to take multiple frames and stitch them together in Photoshop to get the whole scene. Also, the light was so bright, that even at ISO 100 and f22 I wasn't able to get the shutter-speed slow enough to get the effect I wanted on the moving water (even at +2 stops for the Auto-Exposure Bracketing I do for my HDR images). Fortunately, I was prepared with my Hoya Neutral Density Filters . So, I slapped a 6x ND filter on, which gave me the slower shutter speed I wanted.
The clouds were beginning to get spectacular, and the reflected light on the snow was disappearing. I had to act fast. Camera on tripod, shutter-release cable attached, I framed the bottom-right 8th of the image with my lens set to 18mm, and took three exposures at (-2, 0, +2), then immediately shifted the angle of my camera up to fill the lower-middle-right 8th of the image, making sure to overlap about 30-40% of what was previously framed, and repeated the exposures at the exact same settings. I continued this process in a counter clockwise fashion another 6-times until I had 8-bracketed frames of what would be my final image. (for a total of 24 RAW files). I made sure to frame the scene in a way that I could capture more of the surroundings than I would want in my final image, which I'll explain later.
I did this for a few different angles until I lost the light, and then headed back. I wasn't worried about hiking in the dark, because I always hike with a headlamp and spare batteries. But it was getting colder and windier. Well, I wish I could make this story more exciting, but it didn't start snowing until after I got home. But the skiing the next day was EPIC!
ON TO PROCESSING!
Like I said, be prepared, even if you're unprepared. Even though I didn't have my fisheye, I was able to make do with my 18mm. Some of you may be wondering how in the world I got away with combining wide-angle images with Photoshop 's Panoramic stitch option without ending up with an impossibly distorted image. Well, it's simple. After I created my High Dynamic Range images with Photomatix Pro, I selected them in Adobe Bridge (8 in all), selected Tools>Photoshop>Photomerge, and then the photomerge window popped up, asking what type of merge I wanted. I from the options of automatic, reposition, cylindrical, etc., I always select automatic, and then click "Geometric Distortion Correction." "Blend Images Together" should also be checked... it is by default, but if not... well, Duh, blend your images together!
Photoshop with chug away for a while, but once it's done, you have (usually) a beautifully merged image. Before flattening the image, zoom in to 100% to check for weird spots where the images don't quite blend together correctly... you may need to do some blending by hand. My image was blended wonderfully, because each frame overlapped one another by about 30-40%. The more they overlap, the easier it is to blend them together, even if I were to use my distorted fisheye.
Remember how I captured a bit more of the surroundings than I would want? One thing you will notice once your image is merged, is that the edges will either bulge out or pull in (due to shooting with a wide-angle and applying Geometric Distortion Correction). This can be corrected with minor adjustments using the warp tool, or lens distortion filter, followed by cropping. So, basically, anticipate the need to crop a little when making any type of panoramic image. Don't get caught with having to crop out something you wanted in the image, or warping your image to the point that it's more of a Picasso than a photo.
That's all for today everyone. It's been snowing here non-stop for 5 days now, and I'm exhausted from all of the powder I've been skiing. Time to rest!
Be Well!
Friday, February 11, 2011
Storms Peak- Breathtaking Black and Whites
Hi Everyone.
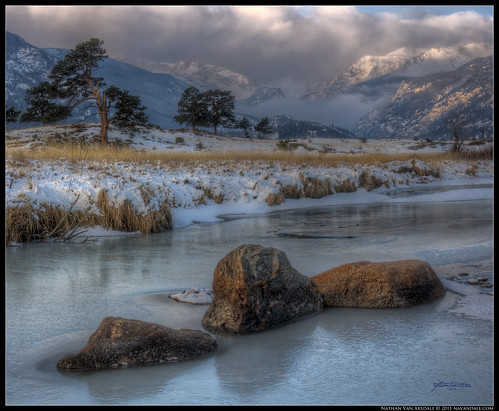
This image of Mills Lake, Storms Peak, and Thatchtop was taken at midday, using the same lighting conditions favored by Ansel Adams. Often when I talk about HDR processing, I mention the processing Adams used in his darkroom. What many people don't realize when they see one of his images, is that he "processed the hell out of 'em." He, and others, would dodge and burn and use all sorts of other techniques which I cannot intelligently speak about. But suffice it to say, composition, exposure, lighting: the "camera-side of photography"--is only part of what makes a fine art image. Processing is the other part.
You can check out my video tutorials to see how I process my HDR images using Photomatix Pro and Photoshop. To make rich Black and White images, I do more than just desaturate or apply split-toning in Adobe RAW. Though that is a quick way to yield a nice B&W. Instead, harking back to Ansel Adams, I create pantone Black and Whites. The easiest pantone for most people to recognize is sepia.
Pantones, tritones, and duotones exist because in the early days of printing, it was near impossible to get completely black and white. So, using mixtures of Cyan, Magenta, Yellow, and Key (i.e. black) (CMYK), for example, I can create a much richer black and white image.
The process is simple. In Photoshop with the image open as an 8 bit image, go to Image>Mode>Greyscale
Then click ok to discard color information.
Then go to Image>Mode>Duotone.
It's THAT easy. Once you select Duotone, a window will open with many preset Duotone, Tritone, and Pantone options. Find one that feels close to what you want. It may require some adjusting per color, but that is easy enough to play around with too.
THIS IS IMPORTANT THOUGH!!! Once you get your image pantoned the way you want it, you must change the image mode back to RGB if you want to save your image as a jpg or tiff, or do any normal levels or curves edits.
I hope that was easy enough to follow. I may go ahead and make a video tutorial for this.
Thanks for visiting!
Be Well!
Wednesday, February 9, 2011
Time to Print

The opening of my exhibit at the Heritage Gallery in Mt. Vernon, WA
Hi Everyone.
I have recently signed up with Smugmug to handle all of my printing needs. Since I still can't afford my own high quality printer
Quality- Smugmug's labs offer some of the best print quality I've seen, on numerous different, high quality materials, from lustre, to matte, to metal, to canvas. And, you can even order a proof of your print, just to make sure the quality is what you want. Not to badmouth anyone, but I tried printing with Mpix for one of my art shows, and 4 of 5 batches of cards were misprinted with a terrible blue cast, and lots of cards had a little white dot or two in random places. After a series of e-mails with their customer service department, they were unwilling to make any corrections or recompense. By this time, I had already had the show, and missed out on a huge opportunity to make some profit. With Smugmug, quality is guaranteed!
Ease- I am not a computer guy... sure I use all sorts of programs on a regular basis, but my internet savvy and HTML skills are slightly better than novice at best. I don't want to spend all sorts of time trying to figure out how to create my website in dreamweaver and set it up to where I can profit from my work (believe me, I have). Smugmug has the easiest interface out of any photo-website I've used, allowing me to make my galleries look professional and unique without spending a bunch of time setting them up.
Products- Smugmug offers a large variety of print products for my customers, saving me on overhead, and letting my customers decide how they want my art printed for their viewing pleasure. Sure, lot's of companies offer products, but usually there are a few decent products, and a bunch of really lame ones... well, ok, that's my opinion, but it's also my opinion that Smugmug has very intelligently selected their product line.
Profit- This is the big one! I have work in galleries throughout the united states. If someone sees one of my pieces hanging on a wall, then comes home and looks me up online, I want to make as much profit as I would have if that person purchased my work off of the wall. Well, Smugmug allows me to standardize my prices, making purchasing fun and fair for everyone involved.
So, take the time to check out my Print Shop at nvaphoto.smugmug.com.
Thanks for reading!
Be well!
Saturday, February 5, 2011
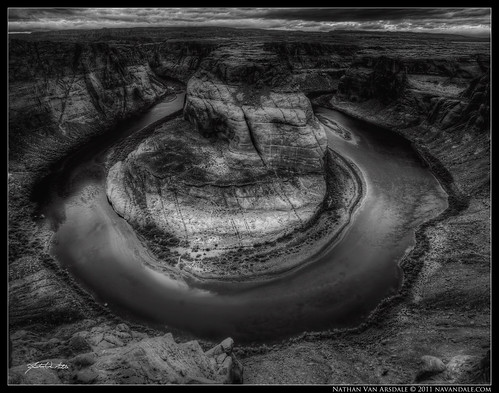
Horseshoe Bend
Probably one of the most recognizable images from the American Southwest is Horseshoe Bend in Page, AZ. A short hike from the convenient parking lot, and hundreds of visitors a day enjoy a sudden geologic marvel.
Although My 15mm fisheye was wide enough to fit the whole bend in the frame, I just wasn't happy with the composition. For such a straight-forward shooting location, I wanted to make an image that's a little more memorable. So, as is normally the case, I set my camera up to take auto-bracketed exposures that I would later merge into an HDR image (See the Video Tutorial). But I decided to turn my camera vertically, and take three frames of the bend, from left to right, overlapping by about 30% or so.
After I processed each frame into an HDR image using Photomatix Pro , I merged the images using Photoshop
 's "Photomerge" option, and selecting "Geometric Distortion Correction." After a couple of songs-worth of processing, the resulting panorama needed a little cropping. Once I had the composition cropped the way I wanted, I went about with my usual editing procedures using Camera RAW and Photoshop's Adjustment Layers. After getting the image where I wanted it as far as contrast, sharpness, and levels, I converted it to Greyscale, and then to a Pantone image under Image>Mode>Duotone to give it a richer black and white effect.
Although My 15mm fisheye was wide enough to fit the whole bend in the frame, I just wasn't happy with the composition. For such a straight-forward shooting location, I wanted to make an image that's a little more memorable. So, as is normally the case, I set my camera up to take auto-bracketed exposures that I would later merge into an HDR image (See the Video Tutorial). But I decided to turn my camera vertically, and take three frames of the bend, from left to right, overlapping by about 30% or so.
After I processed each frame into an HDR image using Photomatix Pro
Thursday, February 3, 2011
How to apply Finishing Touches to HDR photos using Camera RAW and Photoshop Adjustment Layers
This is the final video tutorial using my HDR photo of the Tower Bridge in London: "Queen's Bridge"
The previous two tutorials covered How to Create an HDR image using Photomatix Pro and How to Create an HDR image from 1 RAW file, and how to fix ghosting from moving objects using Layer Masks in Photoshop . My goal with these tutorials is to introduce you to basic tools that you can then expand upon to make your own works of art. Have a suggested tutorial? Feel free to leave me a comment or suggestion any time.
The previous two tutorials covered How to Create an HDR image using Photomatix Pro and How to Create an HDR image from 1 RAW file, and how to fix ghosting from moving objects using Layer Masks in Photoshop
<iframe src="https://player.vimeo.com/video/19812796" width="640" height="360" frameborder="0" allow="autoplay; fullscreen; picture-in-picture" allowfullscreen></iframe>
How to polish your HDR images using Adobe Camera Raw and Photoshop CS4 from Nathan Van Arsdale on Vimeo.
<p><a href="https://vimeo.com/19812796">How to polish your HDR images using Adobe Camera Raw and Photoshop CS4</a> from <a href="https://vimeo.com/navandale">Nathan Van Arsdale</a> on <a href="https://vimeo.com">Vimeo</a>.</p>
Tuesday, January 25, 2011
How to Create an HDR image from 1 RAW file, and how to fix Ghosting Artifacts using Photomatix Pro and Photoshop
How to Create an HDR image from a Single Raw File, and how to Fix Ghosting Problems using Layer Masks from Nathan Van Arsdale on Vimeo.
Thursday, January 20, 2011
How to Create an HDR image using Photomatix Pro

Queen's Bridge, originally uploaded by navandale.
Curious how I made this image? Check out my cheesy, informative video tutorial below to see how I generated this HDR image using Photomatix Pro
How to Create a HDR (High Dynamic Range) image using Photomatix Pro. from Nathan Van Arsdale on Vimeo.
Emerging
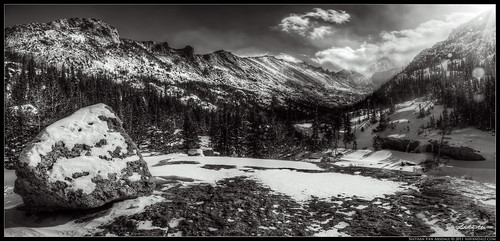
Rocky Mountain National Park, sunrise in Moraine Park.
I lucked out with this image. The previous day when I drove into Estes Park, a snowstorm hit. This was to be the beginning of the Huge winter storm of 2010. I found a place with internet connection, and the forecast called for snow and clouds for the next few days. I had a decision to make: stay and hope for the best, or go on down south to the San Juan Mountains...
I decided to stay. This morning I woke up to dull clouds covering the entire sky, but I drove on into the park anyway. The dim light of dawn provided little promise, but I hiked along this river in Moraine Park, taking shots here and there. Then I found these rocks, and the cool tree in the background... but this scene was against a backdrop of gray. I decided to set up my tripod anyway. After a few shots, I was ready to move on. Then, all of the sudden the fog lifted to reveal emerging mountains. As the fog continued to lift, the morning sun gently bathed the waking mountains, trees, and rocks with warm light.
This is an Panorama from 3 Vertical HDR images, each image processed from 3 RAW images (-2, 0, +2) using Photomatix Pro and Adobe Photoshop
I lucked out with this image. The previous day when I drove into Estes Park, a snowstorm hit. This was to be the beginning of the Huge winter storm of 2010. I found a place with internet connection, and the forecast called for snow and clouds for the next few days. I had a decision to make: stay and hope for the best, or go on down south to the San Juan Mountains...
I decided to stay. This morning I woke up to dull clouds covering the entire sky, but I drove on into the park anyway. The dim light of dawn provided little promise, but I hiked along this river in Moraine Park, taking shots here and there. Then I found these rocks, and the cool tree in the background... but this scene was against a backdrop of gray. I decided to set up my tripod anyway. After a few shots, I was ready to move on. Then, all of the sudden the fog lifted to reveal emerging mountains. As the fog continued to lift, the morning sun gently bathed the waking mountains, trees, and rocks with warm light.
This is an Panorama from 3 Vertical HDR images, each image processed from 3 RAW images (-2, 0, +2) using Photomatix Pro
Subscribe to:
Posts (Atom)