|
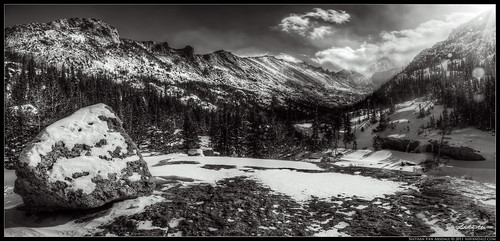
| "Fallen Leaf Falls" |
The other day I arrived home a little earlier than usual... well, a lot earlier than usual. It was noon, and a beautiful day. I didn't feel like sitting inside and playing on the computer, and I happen to live (at the moment) in one of the most beautiful places on Earth, South Lake Tahoe, CA. So, I decided to have another photo-adventure. My neighbor informed me of a waterfall near Fallen Leaf Lake, a beautiful glacial lake next to Lake Tahoe, and said it was about a 30 minute hike.
Eager for the adventure of newness, I grabbed my case-logic camera bag , tripod, and set out towards Fallen Leaf Lake. However, since it's winter, Fallen Leaf Lake Rd. was closed (a fact I found out upon reaching a gate). No worries, I'm always up for a bit of a nature walk. Of course I realized that this unexpected turn would likely add a bit of time to the 30-minute prediction.
It was a warm walk through melting-snow-covered cedar forest, but once I got to the lake, the wind picked up. This made me incredibly happy, because that meant snow was blowing in, and I LOVE when it snows. But, that also meant I had to pick up my pace, because I didn't want to be caught in the snow after dark, and the sun was getting lower in the sky.
Well, after about an hour and a half walk, I arrived at Glen Alpine Creek, which empties into Fallen Leaf Lake. I love waterfalls, and natural bodies of water in general, so I was very excited when I saw the size of the waterfall. It was huge, covered in ice and snow, and picking up a beautiful glow from the light of the clouds. The deep snow around the rocky bank made for some very precarious positions on my part. I hustled all over the place trying to find good angles, while at the same time not getting footprints all over the foreground.
DRATS!
I only brought my Tamron 18-250 lens, which was just not wide enough to capture the whole scene from where I needed to be. Normally I would also have my Canon 15mm fisheye lens, but I neglected to throw it in my bag. This meant I was going to have to take multiple frames and stitch them together in Photoshop to get the whole scene. Also, the light was so bright, that even at ISO 100 and f22 I wasn't able to get the shutter-speed slow enough to get the effect I wanted on the moving water (even at +2 stops for the Auto-Exposure Bracketing I do for my HDR images). Fortunately, I was prepared with my Hoya Neutral Density Filters . So, I slapped a 6x ND filter on, which gave me the slower shutter speed I wanted.
The clouds were beginning to get spectacular, and the reflected light on the snow was disappearing. I had to act fast. Camera on tripod, shutter-release cable attached, I framed the bottom-right 8th of the image with my lens set to 18mm, and took three exposures at (-2, 0, +2), then immediately shifted the angle of my camera up to fill the lower-middle-right 8th of the image, making sure to overlap about 30-40% of what was previously framed, and repeated the exposures at the exact same settings. I continued this process in a counter clockwise fashion another 6-times until I had 8-bracketed frames of what would be my final image. (for a total of 24 RAW files). I made sure to frame the scene in a way that I could capture more of the surroundings than I would want in my final image, which I'll explain later.
I did this for a few different angles until I lost the light, and then headed back. I wasn't worried about hiking in the dark, because I always hike with a headlamp and spare batteries. But it was getting colder and windier. Well, I wish I could make this story more exciting, but it didn't start snowing until after I got home. But the skiing the next day was EPIC!
ON TO PROCESSING!
Like I said, be prepared, even if you're unprepared. Even though I didn't have my fisheye, I was able to make do with my 18mm. Some of you may be wondering how in the world I got away with combining wide-angle images with Photoshop 's Panoramic stitch option without ending up with an impossibly distorted image. Well, it's simple. After I created my High Dynamic Range images with Photomatix Pro, I selected them in Adobe Bridge (8 in all), selected Tools>Photoshop>Photomerge, and then the photomerge window popped up, asking what type of merge I wanted. I from the options of automatic, reposition, cylindrical, etc., I always select automatic, and then click "Geometric Distortion Correction." "Blend Images Together" should also be checked... it is by default, but if not... well, Duh, blend your images together!
Photoshop with chug away for a while, but once it's done, you have (usually) a beautifully merged image. Before flattening the image, zoom in to 100% to check for weird spots where the images don't quite blend together correctly... you may need to do some blending by hand. My image was blended wonderfully, because each frame overlapped one another by about 30-40%. The more they overlap, the easier it is to blend them together, even if I were to use my distorted fisheye.
Remember how I captured a bit more of the surroundings than I would want? One thing you will notice once your image is merged, is that the edges will either bulge out or pull in (due to shooting with a wide-angle and applying Geometric Distortion Correction). This can be corrected with minor adjustments using the warp tool, or lens distortion filter, followed by cropping. So, basically, anticipate the need to crop a little when making any type of panoramic image. Don't get caught with having to crop out something you wanted in the image, or warping your image to the point that it's more of a Picasso than a photo.
That's all for today everyone. It's been snowing here non-stop for 5 days now, and I'm exhausted from all of the powder I've been skiing. Time to rest!
Be Well!